
Sunday, September 6, 2015
First Paracord Braid

Wednesday, September 2, 2015
Plugging Along

Friday, July 24, 2015
Inkle Band
I finally dusted off the old inkle loom and made a strap for my hand-knitted treat pouch for dog training. The instructions called for a clip to attach it to your belt. I don't wear belts and having it hanging from one clip made it bunch up so it was difficult to use. I had attached a cord which worked a lot better, but didn't look all that nice. So-time to do some inkle weaving. Much better. And I can wear it under my t-shirts as a pocket when my pants are pocketless!


Wednesday, May 27, 2015
Bobbin Along

I did figure out how to make my own bobbins. At $20 a pop, I thought it would be worth it to make my own. I came up with this with dowels and beads. I love em. It only takes me five minutes to make one. I'm not so good at making the non-slip loop though.

Friday, May 22, 2015
Feeling Loomy


Saturday, December 20, 2014
Needle Felted Dorper Sheep

I decided to make a last minute present of a needle felted sheep. Dorpers are one of the favorite breeds of sheep of people who keep sheep to train their border collies on. They are hair sheep - meaning they don't have usable fleece. They are very hardy, parasite resistant and easy keepers.They often have dark heads and white bodies although mixes come in all sorts of pretty spots and colors.
Friday, December 19, 2014
Mills and Snowmen

And here's the needle felting project.

Monday, December 8, 2014
Mini Warping Mill
One major obstacle to weaving in a camper is winding a warp.
Several years ago I had made a warping mill out of pvc pipe. It wasn't elegant, but it saved wear and tear on my arm trying to use a warping board.
When I moved to Texas and into a camper, I found the warping mill was just too big and I didn't have a table to set it on.
 It also seems to be missing one cross piece.
While browsing online, I came across a teeny tiny warping mill. That started my brain cranking out ideas. What if I cut this warping mill down to fit my small folding table? PVC is easy to cut and drill and I'd have something I could actually use. I won't be doing any large pieces for a while until I find a place where I can use my floor looms. Better to make small pieces and stitch them together than none at all.
I'll start on this as soon as I finish my needle felting projects.
Several years ago I had made a warping mill out of pvc pipe. It wasn't elegant, but it saved wear and tear on my arm trying to use a warping board.
When I moved to Texas and into a camper, I found the warping mill was just too big and I didn't have a table to set it on.
While browsing online, I came across a teeny tiny warping mill. That started my brain cranking out ideas. What if I cut this warping mill down to fit my small folding table? PVC is easy to cut and drill and I'd have something I could actually use. I won't be doing any large pieces for a while until I find a place where I can use my floor looms. Better to make small pieces and stitch them together than none at all.
I'll start on this as soon as I finish my needle felting projects.
Wednesday, September 24, 2014
Little loom.

I dragged my homemade table loom into the camper so I can work on the rugs. I have to move it to open the fridge or make the bed but otherwise it fits pretty well. Now I just need to get something for the warp. I'm thinking I'd like to get some nylon string that won't rot out, even though I hate working with it. It's slippery and a little harder to warp the loom. I'm better at warping now so it should be ok.
Sunday, September 14, 2014
Re Rag Rug Experiment

It came apart pretty easily, but I should have measured it before I started ripping it apart so I'd know how much rug I'll have to work with. I don't have a place to set up my bigger looms so I'm going to see what I can do with a table loom. I think I'll make smaller pieces and stitch them together.
Monday, July 7, 2014
More Lucets

I made these lucets after reading up on home made ones. The green one is made from polymer clay. It was old and somewhat dried out and I'm not good with clay either. I don't even have an oven, but I read that you could put it in a plastic container and cover it with water and harden it in the microwave! It worked! The yarn is a little thick and stiff and it doesn't slide very well. I have to fiddle with each knot to get the right tension. I think it's the yarn though. When I'm done with this one, I'll try a different yarn.
The fork one is slippery enough, but it's small and fiddly. I'm not a tiny and fiddly kind of person. I think it would work better if I hadn't bent the tines out.
I don't know if I'll be able to do any cord thick enough to be a dog leash (although my old dog only needs a thin cord just to keep him from wandering out into the road when we walk.)
I managed to get a scrap of wood from a woodworker friend. When I get the ambition, I'll see if I can made a wooden one.
Wednesday, July 2, 2014
The Lucet


I've tried kumihimo cording which does beautiful cords, but it's a bit tedious. Great for meditating.
I read that you could make simple lucets out of a plastic spoon by breaking off the two middle tines. I realized I had just the thing to practice on - a wooden shuttle.
This was my first practice piece with thick yarn. It was even easier than I thought and went fast. Now I really have to get a proper lucet.

Thursday, June 26, 2014
Bass Cosy Part C

I can still add some tufting to keep the batts in place. I've done some but I'm easily bored.
Tuesday, June 10, 2014
Bass Cosy (Pt 2)
I took my stuff over to a friend's house to use her sewing machine. I got more done than I expected. I now have a fluffy case for my bass - almost. I still have to attach handles and do some tufting and attach velcro for closure. The thing is so fluffy, I decided it was a cosy instead of a gig bag. Well, it will keep my ubass nice and warm.


I was kind of winging it on this one. I'm not much for the sewing arts. I cut out the basic shape I wanted and sewed around the edges with the right sides together. I reached in and pulled right side out. I had left an opening at one end to put the batts through. I had thought at first I would lay the batts down before sewing, but realized that would be a major mistake on this project. I had to sew up the top and bottom a bit. I didn't have a long zipper or even the money for a zipper so the two handles, one on each side will hold the bass in until I can get some Velcro to hold the sides shut.
I was kind of winging it on this one. I'm not much for the sewing arts. I cut out the basic shape I wanted and sewed around the edges with the right sides together. I reached in and pulled right side out. I had left an opening at one end to put the batts through. I had thought at first I would lay the batts down before sewing, but realized that would be a major mistake on this project. I had to sew up the top and bottom a bit. I didn't have a long zipper or even the money for a zipper so the two handles, one on each side will hold the bass in until I can get some Velcro to hold the sides shut.
Monday, June 9, 2014
Gig Bag (Bass Cosy Pt. 1)
I know I have been lax in the craft department. I just don't have the space right now to do much and I've been obsessed with playing music. See my music blog here.
I just finished making a music stand out of an old suitcase and my next project is to make a gig bag for my ubass. It is built on the body of a 3/4 size guitar so the bag will be guitar sized.
I didn't have any padding so I carded eight batts of fleece. I imagine that they will felt down over time, but if I put enough in there, it should be fine - if fluffy for a while. I'll be working on this at a friend's house tomorrow so I'll take some pictures as I go. For now, here's a picture of the instrument in need.
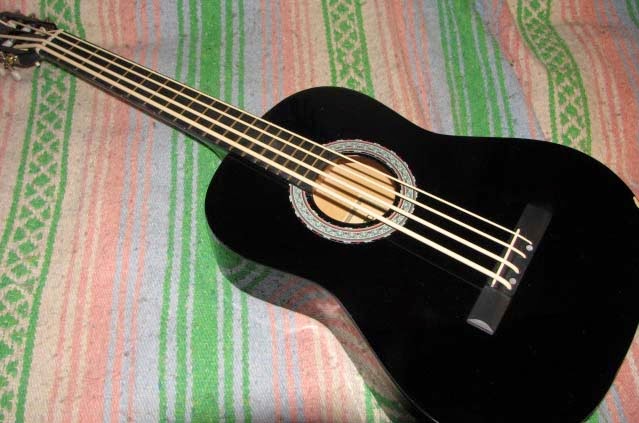
I just finished making a music stand out of an old suitcase and my next project is to make a gig bag for my ubass. It is built on the body of a 3/4 size guitar so the bag will be guitar sized.
I didn't have any padding so I carded eight batts of fleece. I imagine that they will felt down over time, but if I put enough in there, it should be fine - if fluffy for a while. I'll be working on this at a friend's house tomorrow so I'll take some pictures as I go. For now, here's a picture of the instrument in need.
Saturday, February 8, 2014
Slouch Hat

I just finished a new hat made from yarn scraps. I found the pattern on Ravelry and I absolutely love it. My other little cap made me look like a bag lady. This one does not slide down over my eyes like many of my other hats.
There are some other great patterns on there I'm going to try.
Monday, November 18, 2013
Toasty Toes

I have several patterns for slippers and chose the quickest one. The author made these up in one day, but it took me two days. I found the pattern on one of my favorite DIY web sites - Here.
I always am disappointed when I knit socks or slippers and within weeks the soles start to wear out. I wanted to make some that would last. I found one pattern that called for polar fleece yarn. I had no idea what that was, but finally it dawned on me that the yarn was actually made from Polar Fleece!!! I looked up the yarn and it wasn't terribly expensive, but a pair of slippers would have cost me $30 to $50. Now the whole purpose of knitting them myself is to use my own yarn or whatever so that it's CHEAP - as in FREE.
Well, duh. I had an old fleece jacket with a broken zipper that was in the give/throw away bag. I rushed to take it out and started cutting strips to make my own yarn. (I used to have a nice rotary cutter and mat but they vanished during the move. I had to use scissors and wear gloves to prevent blisters.)

Then I started knitting.
I did omit the pom-poms. I'm just not a pom-pom type of girl, and I added a small loop on the back of the heel so I could hand them up.


Tuesday, July 2, 2013
Gazebos and Fleece

I have a rule that every fleece has to be washed before it's stored. I don't always manage to do that, however. I was given several fleeces just before moving back to Texas. They came with me in plastic bags and stored in metal trash cans. Not the best environment for them.
I finally decided I had to do something with them - either wash them and use them or throw them out. Surprisingly, they were all in pretty good condition. I took advantage of a friend's gazebo for skirting and drying. Now that's the way to clean fleece!
Monday, June 10, 2013
One Mug Rug is Not a Set.

Friday, May 31, 2013
OK Where's the Yarn?

In the meantime, I took a ball of yarn that was the right color for a stripe. Put it on my desk.
It took several days to find the small shuttles that had fallen behind the desk. I was thrilled to find several the right size for the little loom. Now I can't find that ball of yarn.
I won't mention what my desk looks like....
Subscribe to:
Posts (Atom)